How to Enable Hyper-V on Windows 11 Home: Full Guide, Requirements, and Practical Use Cases
Blog Post
Hyper-V is Microsoft’s native virtualization platform, originally available only on Windows Server and higher-end desktop editions such as Windows Pro and Enterprise. With the growing importance of virtualization for developers, IT professionals, and even personal users, Hyper-V has become a core productivity tool in the Windows ecosystem.
Officially, Windows 11 Home does not support Hyper-V. However, with the right system requirements and configuration, it is possible to enable and use Hyper-V on Windows 11 Home. This guide explains not only how to activate it, but also why and when doing so makes sense.
Understanding Hyper-V and Why It Matters
Hyper-V allows you to create and manage virtual machines directly on Windows, without relying on third-party tools such as VirtualBox or VMware. Its biggest advantage is deep integration with the Windows kernel, resulting in better performance, security isolation, and long-term stability.
For users who frequently test software, manage isolated environments, or require secure access to sensitive services, Hyper-V offers enterprise-grade capabilities even on a personal PC.
Step 1: Check if Your System Supports Virtualization
Before enabling Hyper-V, your hardware must support virtualization. Hyper-V requires:
- VM Monitor Mode Extensions
- Virtualization enabled in firmware (BIOS/UEFI)
- Second Level Address Translation (SLAT)
- Data Execution Prevention (DEP)
To verify this, open Command Prompt (Win + R → cmd) and run:
systeminfo
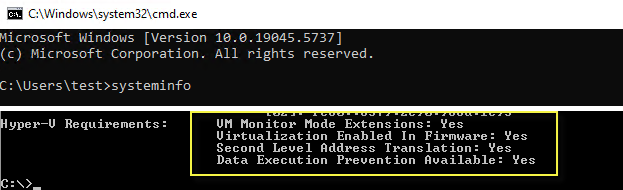
Scroll to the Hyper-V Requirements section. If all items show “Yes,” your system is compatible.
If not, alternatives like VirtualBox or VMware may be better suited for your hardware.
Step 2: Enabling Hyper-V on Windows 11 Home
Although Microsoft restricts Hyper-V in Home editions, the required packages already exist in the OS. You can enable them manually using DISM.
- Create a new text file and name it
install-hyper.bat - Paste the following content into the file and save it:
pushd "%~dp0"
dir /b %SystemRoot%\servicing\Packages\*Hyper-V*.mum > hyper-v.txt
for /f %%i in ('findstr /i . hyper-v.txt 2^>nul') do dism /online /norestart /add-package:"%SystemRoot%\servicing\Packages\%%i"
del hyper-v.txt
Dism /online /enable-feature /featurename:Microsoft-Hyper-V -All /LimitAccess /ALL
pause
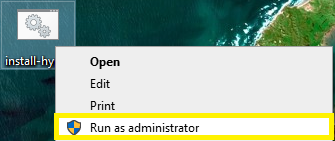
- Right-click the file and select Run as administrator
- When prompted, press Y to continue
- Wait for the installation to complete and reboot the system
After rebooting, Windows may display a brief update screen — this is normal.
Step 3: Verifying Installation
After restarting:
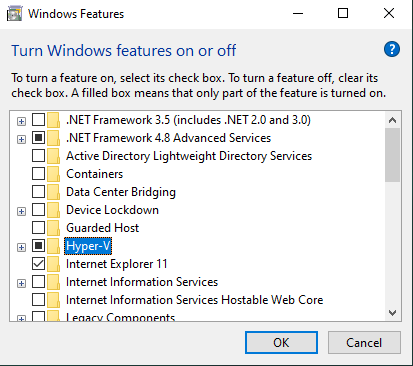
- Press Win + R → optionalfeatures
- Confirm that Hyper-V and Hyper-V Management Tools are enabled
- Search for “Hyper-V” in the Start Menu to launch Hyper-V Manager
At this point, you can begin creating and managing virtual machines on Windows 11 Home.
How to Disable Hyper-V (If Needed)
You can disable Hyper-V at any time using one of the following methods:
Method 1: Optional Features
- Win + R →
optionalfeatures - Uncheck Hyper-V and Hyper-V Management Tools
- Restart the system
Method 2: Command Line
PowerShell:
Disable-WindowsOptionalFeature -Online -FeatureName Microsoft-Hyper-V -All
Or DISM:
DISM /Online /Disable-Feature /All /FeatureName:Microsoft-Hyper-V